
It recently occurred to me that I may be a bagpipe maker. Only one way to find out ... so I bought a Jet JWL-1236 wood lathe, chosen because of good reviews and because the ads specifically say it has a hollow tailstock, although for all I know that's a standard feature on all wood lathes. Anyway Amazon.com had it on sale around xmas time (2006) for $499.95 including shipping.
I'm not trying to make the pipe chanter yet, partly because our band requires us all to use the same model (McCallum) for consistency, but mostly because it has a conical bore which will need a reamer of just the right size and taper. (Update: I did make a chanter later in 2007 but didn't take photos, its bottom two notes aren't stable but it's better than nothing.) So I just made the drones. As far as I can tell (from diagrams on the net and from my own measurements of my McCallum and Pakistani pipes) the bores are cylindrical, so they can simply be drilled. Well that's what I did anyway.
For me the part that seemed absolutely magical was the long-hole boring, i.e. making a hole down the (almost) exact center of a piece of wood up to 14.5" long. I bought a couple of books and did lots of web surfing trying to figure out the "right" way to do it. I'm not sure I succeeded, but I definitely did find a workable way, so that's what I'll describe here.
I went to a couple of meetings of nearby AAW chapters hoping to absorb some enlightment, but I get the impression that most woodturners are totally obsessed with making bowls. Even spindle-turning seems not to be done much. The only through-boring stuff I found was mostly for threading cords through lamps, so a "lamp auger" seems to be the most wood-lathe-specific tool that's commercially available for long-hole boring. But there isn't much choice in sizes, and they cost more than used gun drills.
I wish I'd started taking pictures earlier, but I'd already made the drones and blowstick before that occurred to me, so I'll just show how to bore one of the stocks. The tools needed are:
I know it's supposed to be OK to start with square stock but I just didn't have the stomach for that kind of violence. So I zipped the corners off on a bandsaw to get an octagonal cross-section. Then I installed the live cup center including the spur in the tailstock. Before I forget, I can't find anywhere in the Jet manual where they tell you how to remove tools from the tailstock -- the answer is to retract the ram all the way. Maybe that's supposed to be obvious but I never would have thought of it (I found it in the manual for another lathe). This also means you can't have the ram retracted all the way when you're trying to install something in it, because it won't go in far enough to jam in place, and depending on the exact shape of its MT2 shank, each tool might have a different idea of what "retracted all the way" means.
Anyway, I drilled a small pilot hole just to make sure the center spike of the live center would penetrate all the way, and then held that end of the workpiece over the live center (with the tailstock locked, far away from the headstock), and tapped the other end with a hammer so that the outer cup of the live center would mark the workpiece. That's so that later I can take it off, remove the center spike, and be sure it's still centered when I put it back on.
Here's what it looked like after I did that:
With the right-hand end of the workpiece marked, I mounted it on the live cup center, with the spur drive on the headstock end:

Then I turned it round using a roughing gouge, with the lathe running at low speed. It came out a bit tapered but that's OK, the point right now is to get a circular cross-section so it'll center in the lathe chuck later. Mike Darlow's books give a good introduction to woodturning, which I needed because I've never done it before. The explanation he gives of roughing basically said to rest the chisel on the toolrest with the tip up, and then slowly bring it down until the bevel starts knocking against the corners of the workpiece. Then just bring the tip down a tiny bit more until it starts cutting. You can pretty much wing it for the rest -- just make sure you work off the ends of the workpiece, instead of trying to come on from the ends. I found that it worked well do make each pass a series of smaller passes as the book said (and so did the Jet manual), and then I held the chisel left-handed for the pass closest to the headstock. Not sure if that last part is right but it seemed to work OK.

OK now with the outside rounded, I took out the spur drive and mounted the chuck, knocked the spike out of the live center, and put everything back together with the L.H. end of the workpiece mounted in the chuck. That way I can bore straight through without hitting the spur drive and ruining the drill, since the chuck and headstock both have holes through the centers. For lamp augers they have a special spur drive with a pilot stud in the center which fits the same diameter hole drilled by the lamp auger, so you can drill in halfway and then flip the piece and drill in from the other end and presumably the holes will meet in the center. I didn't want to do that because there's no way it'll be perfect, so there will always be a mismatch where the holes meet, which is no problem for a lamp cord but it'll mess up the sound of a wind instrument.

Now the real fun begins. The gun drill is held by hand (I wore leather work gloves) and pushed through the hollow center of the tailstock. Since my 5/16" drill is smaller than the 3/8" tailstock bore, I used 3/8" and 11/32" pieces of brass tubing from a hobby shop (one inside the other) to take up the slack. That way the gun drill is centered and aligned with the axis of rotation, which is very important. I didn't rig up compressed air through the gun drill so I had to withdraw it very often (probably every 1/4" or so) to let it cool and to dump the chips (I kept it flute-side up so it could carry the chips out).

That gives a blank, which is the same (except for dimensions) for every part of the bagpipe:
The hollow tailstock is only 3/8" in diameter and many of the holes I need to bore are bigger than that -- for the stocks it's 13/16", some measurement charts say 3/4" and that's what my Pakistani pipes have but it meant the ash plugs were a really tight fit and the Little Mac kept getting pulled off the blowstick, so 13/16" is definitely better. Anyway this means now I want to get unobstructed access to the right-hand side of the workpiece so I can drill into it.
I don't trust the chuck to single-handedly keep the workpiece straight, especially for the longer pieces, so I used a steady rest to support the right-hand end. But I wanted to get the R.H. side of the workpiece centered before I adjusted the steady rest, so I put a dead center in the tailstock, and without tightening the chuck, I slid the tailstock left until the dead center was in the pilot hole and then locked the tailstock. Then while pushing the workpiece against the dead center, I tightened the chuck. Then I brought the steady rest's bearings down to press against the workpiece, and tightened them in place.

Now it's safe to unlock the tailstock and slide it out of the way:

When I first got the lathe I got a bit carried away with cleaning up the ways (and the chuck) with mineral spirits and then putting car wax on so they wouldn't rust. Probably not a good idea since now the tailstock never quite locks in place, but the good news is that when it's unlocked the tailstock slides very smoothly, which works out well for the next step. Which was to mount the drill bit for the final size (13/16" in this case) in the tailstock by whatever means works (this is an MT3 bit mounted in an MT3/MT2 extension):

Then I fired up the lathe, and slowly and carefully slid the tailstock left until the drill centered in the pilot hole (which was a little bit of a shock) and started cutting. I withdrew it every so often to clear the chips (heat wasn't much of a problem in this case).

That's it! For tuning chambers (which are 11/16") you don't want to drill all the way through, so I just used masking tape to mark the proper depth on the drill and stopped at that point. The outside is just regular spindle turning, with the piece mounted between the chuck and a conical live center (not a cup center, now that there's a pilot hole which is bigger than the cup center's spur). The chuck gets in the way at the left end so you have to reverse the workpiece to finish.
I forget where I heard that you're supposed to always work downhill but it's definitely true, if you try to move a gouge from a small-diameter area towards a large-diameter area, it tends to take off on its own and trash the area. I had to remove one of the mounts from one of my tenor drones after it got totally mangled this way. I definitely don't have the hang of the skew chisel, but it seems as if scrapers are a very good way to get nice tenons, as long as you bring the toolrest very close to the work, otherwise scrapers tend to get away from you and do lots of damage.
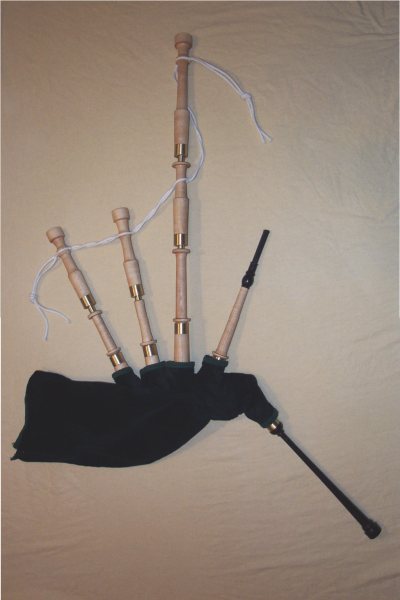
Assembled pipes (with McCallum chanter), finished February 19, 2007:
John Wilson (wilson@dbit.com), February 2007